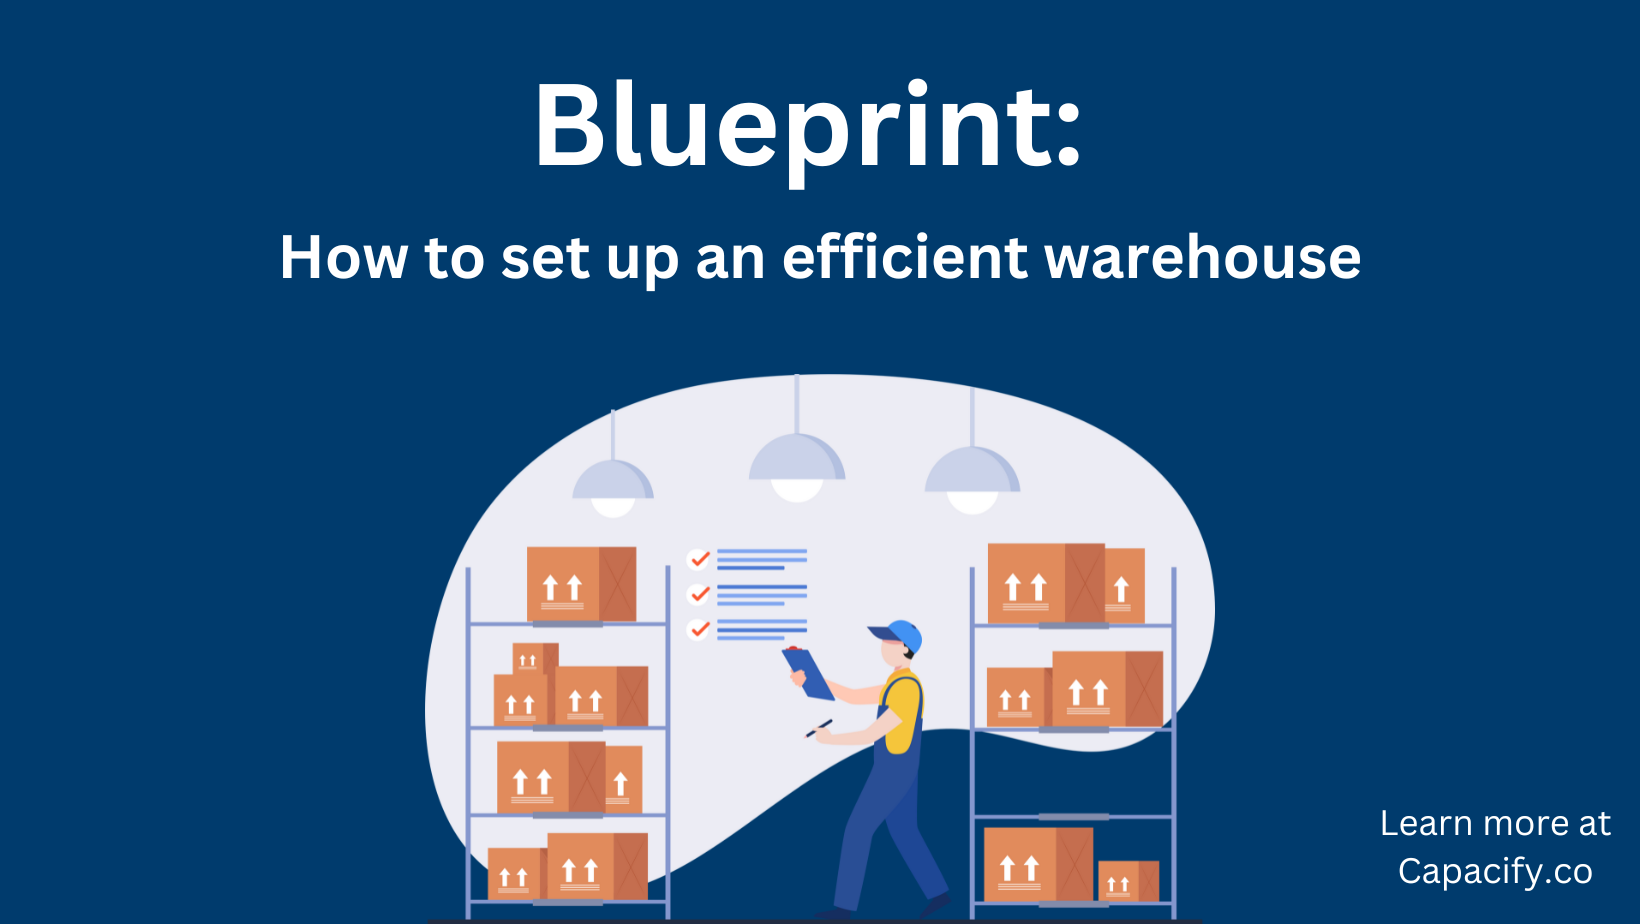
This blueprint covers practically every aspect of starting a DTC or e-commerce fulfillment warehouse. It is aimed at smaller businesses of less than $20 million in revenue, but will work for larger companies too.
What you will read in this blueprint comes from our own experience in DTC fulfillment, which stretches all the way back to 1999. It is exactly the same strategy that we use today in our working warehouses and is based on the guiding principles of the Capacify Doctrine, a set of six simple principles that guide the way we set up operations.
There is a lot here to read and absorb, but if you get through it all, you are on your way to taking charge of a critical part of your company’s operations. If you have questions, we are here to help.
The document is divided into five sections:
Now, let’s get started…
- Introduction: Why do your own fulfillment?
- Setup: Obtaining, furnishing, and organizing your warehouse
- Operations: Job roles and staff
- Inventory: Understanding purchasing and inventory strategies
- Appendixes
Introduction: Why do your own fulfillment?
Currently, DTC and e-commerce companies are facing headwinds. The marketplace is efficient and mature, fighting for customers is getting more expensive, and market conditions are rapidly changing in ways that are not likely to make things any better.
Many businesses have decided to focus on product development and marketing while outsourcing operations. One of the first areas of operations to be outsourced is fulfillment, which ends up in the hands of 3PLs (third-party fulfillment warehouses that ship orders on a contract basis).
For small businesses, outsourcing to a 3PL is very often a mediocre experience if not an outright disaster. The horror stories are everywhere; in fact, in our network of operators of businesses under $20 million, we rarely hear anyone bragging about their 3PL. What we hear instead are stories about silly errors, high fees, overcharging, orders shipping late, and inventory getting lost/damaged. And when these things happen, the contract overwhelmingly favors the 3PL, leaving the merchant with a damaged business and little recourse.
In the ultra-competitive marketplace in which we operate, finding strategic advantages is critical. Rescuing your company and your customers from the experience of a mediocre 3PL is a competitive advantage that is often overlooked.
Here are three reasons why you should consider self-fulfillment:
Operational excellence
Well-run operations give you a competitive advantage because you can provide a level of excellence that almost certainly cannot be matched when you outsource.
The concept of keeping operations in-house is not sexy and does not generate a ton of Twitter action, but think about the best companies in the world. Every single one of them shares one characteristic: operational excellence. And, very likely, almost every single one of them is slow to outsource operations.
Great companies do not avoid operations; they embrace them. They don’t subcontract them out; they keep them in-house so they can carefully control them.
If you do your own fulfillment and you do it well, your orders never end up getting prioritized behind a bigger client at a 3PL. If a customer has a problem with an order, you don’t have to enter a ticket with a 3PL; you simply need to call your warehouse. You won’t end up waiting for an understaffed 3PL to get your product checked in so you can start selling it.
You get the idea.
In a world of customer service mediocrity, great fulfillment makes you stand out in the crowd. In an age of high customer acquisition costs, great fulfillment helps you retain more customers and increase their LTV (lifetime value). And, in an era of customer reviews, great fulfillment can become one of your best customer magnets.
Customization
Fulfillment is not just an operation; it should be part of your marketing strategy. It is an important touchpoint with your customers that should not be squandered. If you are wise, you will think carefully about every aspect of the package that your customer receives because it reflects on you.
Do you want to use a particular box? Do you want to split-test the effectiveness of inserts? Do you want to create a special unboxing experience? Most 3PLs do not like customization of this sort. They either are not capable of customization or will charge you a small fortune to do it.
If you own this area of operations, you can be nimble with customization, and the sky is the limit.
Costs
3PLs are expensive. They charge a neverending stream of fees that all told, will generally be 2-3 times what it would cost you to fulfill the orders yourself. You can find a cost analysis at the end of this blueprint. When the dust settles, you will find that a 3PL costs way more for a very marginal level of service.
Dispelling a myth
Before we get started, let’s dispense with a myth that stops many businesses from opening warehouses.
No, doing your own fulfillment does not suck up all your time and attention and does not destroy your business and personal life.
If you follow this blueprint, you should find that running your own warehouse is smooth and largely hands-off. If you are a CEO, you should not have to think about your warehouse much, and rarely set foot inside it if you don’t want to.
In fact, after hearing horror stories about 3PLs for the past decade, we can safely say that a well-run in-house fulfillment center is probably less of a time suck than a 3PL relationship.
So, going into this process, you need to have two goals: to set up the warehouse properly and to set up ongoing systems that make it run smoothly without you. Both of these goals are very doable and this blueprint will show you how.
Setup: Obtaining, furnishing, and organizing your warehouse
Step 1: Obtaining a warehouse
Deciding whether to lease or buy
One of the first questions you need to answer is whether you want to lease or own your warehouse. We have done both, but today, we lease both of our warehouses, and going forward, we will probably continue to stick with leasing. Your situation may be very different and what is best for us may not be best for you. Here are some factors to consider.
Is the equity you will have to invest in the building the best use of your capital?
You will likely have to put down between 20-100% of the purchase price of the building. If you have capital to spare, that may not be a big deal to you. However, DTC/Ecom businesses are cash-intensive, and very few are sitting on mountains of cash that could not be better utilized somewhere else.
Very likely, you will need a lot of money for inventory, and if you grow fast, your inventory cash needs will explode. So, think carefully before putting your cash into a building.
Can you predict your warehouse size needs going forward?
One of the biggest reasons businesses lease is because they simply do not know the future. They don’t know how much inventory they will be carrying in 3-5 years. If you buy/build a warehouse, how do you know you won’t need a bigger warehouse in a few years? If you do, then what?
Leasing is very attractive because you can easily adjust up or down in size as your business changes.
What business are you in?
It is easy to justify an expensive warehouse purchase by saying it is a “good investment.” In fact, it may be a great investment. But, is real estate investing your core competency? Is it your core business?
Typically, your core business is the best place to invest your cash. While you might see some modest single-digit appreciation in your warehouse value year over year, that appreciation is quite possibly insignificant when compared to the ROI you would get on investing that money in inventory.
No, if you purchase a warehouse, it will not really be part of your business. In fact, if you buy a warehouse, your lawyer and accountant are going to advise you to form a new corporate entity to own it!
We are not against commercial real estate. If you want to invest in commercial real estate, go for it. But, you might consider whether you need to mix your commercial real estate investments with your core business. You can own buildings anywhere, regardless of whether your business is involved or not.
While those are points of consideration, do what is best for you. We don’t pretend to know your situation and needs. For example, you may have a great purchase deal pop up on the market a few minutes from your house. If you want to buy, buy. But, all things being equal, at least consider leasing.
Calculating the needed size
Going high or staying low?
When you are choosing a warehouse size, remember that you are not buying a rectangle; you are buying a cube. For that reason, you have a big decision to make: are you going high (multi-level) or staying low?
There are obvious benefits to using the height in your warehouse. If you have a high ceiling, you can substantially increase the capacity of your warehouse simply by installing pallet rack multiple levels high.
Strangely, warehouses are generally not sold as cubes; you rather pay by the square foot. But, one of your first questions should be about the height. Using all the height is the simplest and cheapest way to get more capacity from a warehouse.
However, this is hardly a no-brainer. There are serious drawbacks to utilizing the height:
- High warehouses require forklifts (or similar machines) to utilize. Forklifts are expensive and generally, you have to pay more for the labor to run them. There is also a lot of danger associated with operating that kind of machinery (both to people as well as inventory).
- Using forklifts requires much wider aisles, which means fewer rows of racking/shelving. So, you cannot really double your storage capacity by going up two pallet levels. To really utilize height well, you have to go several pallet levels high.
- Height creates inefficiency in the workflow because it is much harder to restock inventory.
- Even if you don’t go high, high ceilings are inefficient in terms of conditioning.
Note: Because this blueprint is geared toward smaller businesses just starting out in fulfillment, we are going to mostly stick to single-level warehouse layouts, meaning layouts that do not require forklifts. Doing so limits storage capacity but increases efficiency and saves a lot of cost and complexity. And, even if you end up using multi-level pallet rack, 99% of this blueprint is still applicable.
If you do outgrow a single-level layout, you should get a professional involved to help you plan your pallet rack and equipment. Your local forklift dealer may well do this work for you or be able to recommend someone to draw up plans. Often, an engineer needs to sign off on them.
Area estimations
For the time being, we are not going to be trying to come up with a warehouse layout. You cannot lay out a warehouse until you acquire one, and you can’t acquire one until you know how big it needs to be. So, in this section, we want to help you figure out the rough size you need.
Your warehouse will have four areas that we are going to discuss throughout this blueprint.
- Receiving
- Picking
- Overflow
- Shipping
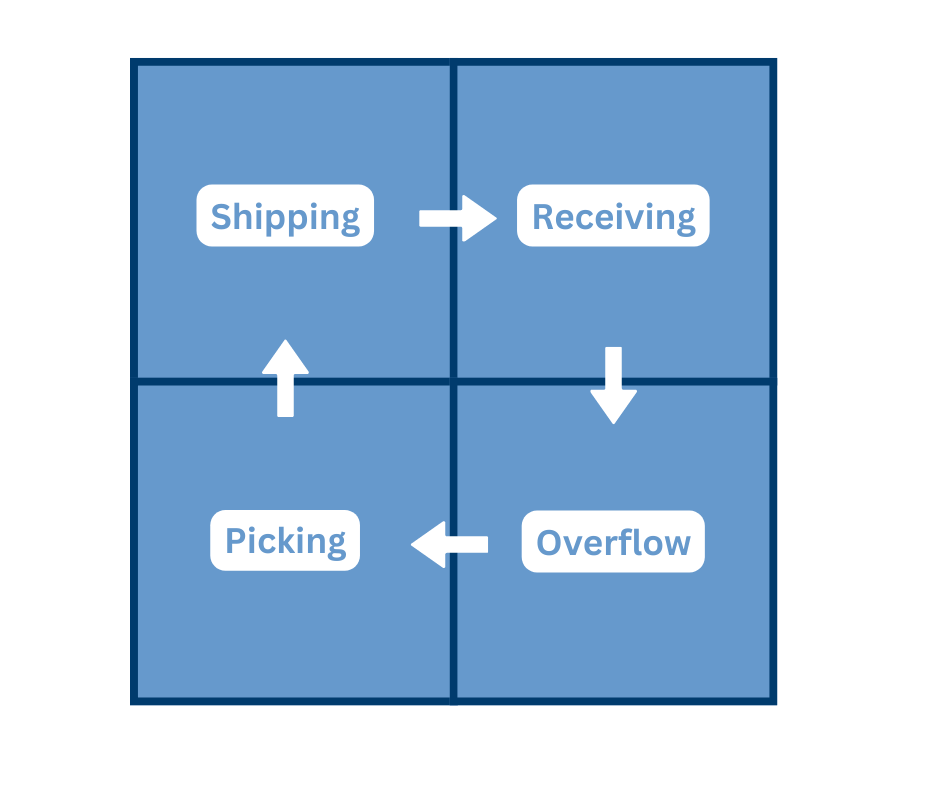
The first thing to do is calculate the rough space needed for each area. Then, you simply need to add the four numbers together to get a target size for the entire warehouse.
Receiving
The receiving area is the place where inbound shipments will be stored and processed before being put away. Your receiving area will be near a cargo door and will largely consist of open space and perhaps a desk with a computer on it.
Think about your inbound shipments. Do you get boxes or pallets? If you get pallets, how many come in a typical shipment? Answering these questions will help you determine how big your receiving area should be. If you receive a few pallets at a time, you might allocate a few hundred square feet to this area, but could get away with less if you had to. If you just get boxes (cases) of product, you may just need enough area for a few tables.
Be a bit more generous in this area than you think you will need. Cramped space is inefficient space, and the receiving area can get messy and congested on heavy days.
Picking
The picking area will be a set of shelves from which pickers “pick” the products for each order. We will discuss how to lay this out in much more detail later, but just to get a rough calculation for how big your picking area should be, ask yourself these questions:
- How many SKUs (individual products) are you selling?
- How big are the SKUs?
- How fast do the SKUs move? (How much space on a shelf should be allocated to each SKU?)
Let’s say that you sell small bottles (3” diameter and 5” high), you have 192 SKUs, and the average SKU sells at a rate of 25/week. You might decide that it is reasonable to put those in bins a foot wide. That would mean you need a total of 192 linear feet of shelves, and if you used shelving units that contained 6 levels of shelves, you would need a total of 32 linear feet of shelving units. If the shelves are 2′ deep, the 32 linear feet would cover an area of 64 sq ft.
Sometimes, you may have very fast movers that do not make sense to keep in bins at all. Typically, these are picked from pallets. If you are going to use pallets in your picking area, estimate them at 16 sq ft each.
Once you figure out the space needed for shelving and/or pallets, triple it to account for aisle space. That will give a rough estimate of your picking area.
Overflow
The overflow area is where you will temporarily put excess inventory that will not fit in the picking area. Generally, this inventory may be on pallets or stored in boxes/cases on heavy-duty shelves.
You might wonder why you should not just make the picking area bigger so that overflow is not needed. Here’s why: doing so would require much bigger bins, which creates more steps and inefficiency for the pickers. Keeping the picking area as small as possible is more efficient.
You may find it hard to calculate the size of overflow, but roughly estimate how many pallets of inventory you might have in excess of what is on the picking shelves. Multiple that number by 16 (a pallet is 16 sq ft) and then multiply by 1.5 to allow for space between pallets. That is your minimum overflow area.
If you want to install pallet rack in your warehouse, this is the area where it makes the most sense.
Tip: If you have occasional temporary surges in inventory, you may be better off finding temporary storage outside the warehouse that you can lease on a very short-term basis. In other words, don’t overdo it on your overflow space if you don’t think it will be used much. You will be paying for it whether it is being used or not.
Shipping
The shipping area consists of several smaller stations:
- A staging area for picked orders (such as a conveyor)
- QA/packing stations (a small desk per station)
- Shipping stations (a small desk per station)
- An area to hold shipments that are ready to be picked up
- An area to hold shipping supplies (such as pallets of shipping boxes)
How big this area should be depends on how many orders you are shipping each day and how big the shipments are. If you are shipping less than 500 packages/day and they are relatively small, you probably only need one QA/packing station, one shipping station, a 30’ run of conveyor, a few pallets of shipping boxes, and space big enough to hold a few pallets of completed shipments. In other words, you could get by with 600-800 sq ft or even less.
Final calculation
If you add the space for each of the four areas together, you get a rough size of how big your warehouse should ideally be. Then, plan for the future. It would not be a bad idea to get a warehouse that is a bit bigger than you really need, both because you expect to grow and also because cramped warehouses are just inefficient and unpleasant.
Other factors
Let’s now talk about some other things you should consider when you start evaluating warehouses.
Conditioning
If you live in an area that gets hot or cold, we strongly encourage you to make sure it is conditioned. It will be very hard to keep great employees if you don’t. This may seem like a small thing but it really isn’t.
In some cases, you may need to condition the building to properly store and protect your inventory. Make sure you know about any temperature or humidity recommendations for whatever you will be storing.
Office space
Unless you are planning to bring your non-warehouse employees to the warehouse location, you don’t need much office space. In fact, we advise against it. When you are at the warehouse, don’t hide in an office. Take a laptop and walk the floor with your staff or put a little desk area out on the floor.
If you really need office space for other staff, get it. But if you don’t have other employees besides warehouse staff in the building, choose a warehouse with as little office space as possible. Office space drives the price up, and in a pure warehouse environment, it will be space gone to waste.
Energy efficiency
There is a huge advantage to renting/buying a new building: efficiency. Old buildings may have utility costs at least double that of a new building and may be impossible to condition properly because they are so poorly insulated and leak air. On top of that, A/Cs are much more efficient now, and new warehouses generally use LED lights rather than expensive-to-operate old-style lighting.
If you are buying or leasing a previously used building, obtain utility records. Test the A/C if you can.
Location
Unless you have a very good reason, avoid leasing/buying space in retail areas or other expensive areas. There is no reason to pay for foot traffic and street exposure when you need neither. Choose an industrial area where the cost will be roughly 50% lower.
Here are other location considerations:
Restaurants
While this sounds insignificant, try to be in an area where your employees can socialize and get away from the warehouse at lunch. You want happy employees, and this is a big deal to them.
Security
Take the time to research crime statistics in any area in which you are interested. If possible, ask neighboring businesses if they have had problems with break-ins.
Convenience
Pick an area that is easy for you and your employees to get to. Consider traffic and access to major roads.
Carrier options
If you have shipping carriers that you prefer to work with, make sure that they are able to service your potential location and do dropoffs/pickups at acceptable times.
Also, be careful about remote areas that may raise your inbound shipping costs. Several carriers will charge your vendors more to ship to remote zip codes, and those costs will end up getting passed to you.
Utilities
Make sure that you can get access to the utilities you need. Most of the time, the potential problems will be with internet service. If you are considering a remote area, double-check that you can get solid internet, preferably from more than one source.
Remember: you will not be able to run a modern fulfillment house without solid access to the cloud. We have had to walk away from more than one location because we found out that it would either cost too much to get internet service installed or that it was just not available at all.
Dock / Truck access
There are two standard configurations for loading/unloading trucks at warehouses. You either:
- Load/unload cargo from ground level by hand, liftgate, or forklift.
- Back a truck up to a dock that is at the same height as the truck cargo floor. This makes it easy to move cargo in and out by pallet jacks, forklifts, or by hand.
Obviously, docks are far more convenient and preferred. There is a hidden cost to not having a dock as well: when delivering/receiving shipments, trucking companies will hit you with a surcharge ($75-$100) for a truck with a liftgate. Depending on the number of shipments you receive, this can add up.
On the other hand, docks are often not available in smaller warehouses (<10,000 sq ft) and you may very well not have any choice.
Regardless of which option you end up with, make sure that trucks have room to access your building. Generally, builders plan access so that trucks have adequate room to back up and turn around, but that is not always the case.
Cost
The costs of buying/leasing industrial warehouses are all over the map and based on geographic location and other factors.
If leasing, you will generally get quoted a price per square foot for the entire year. For example, you may get a price of $10/ft for an 8,000 sq ft building. This means your annual rent is $80,000 ($6,667/month).
Here is the formula to calculate the monthly cost: Price per foot * building size (in sq ft) / 12
The price/ft is not the only cost factor to consider in a lease. You also need to know what kind of lease you are being asked to sign. Here are the most common types:
Gross
The lease amount is “all-in.” The landlord pays for all common area expenses (CAM) such as lawn maintenance as well as insurance and taxes. In some cases, some/all utilities are also covered.
Most so-called gross leases are really modified in some way in the contract (such as carving out electricity or certain repairs) and are called modified gross leases.
Triple-net (NNN)
With this type of lease, the cost of CAM, property insurance, repairs, taxes, and utilities are borne by the renter and are paid on top of the base rate. These costs can be substantial.
If you find yourself comparing costs between warehouse options, make sure you get as close to apples-to-apples as possible. If one of the options is a NNN lease, find out what the expected additional costs would be.
Here is a negotiating tip: ask for the expected additional costs are, and when the landlord (probably) lowballs them, ask to add that amount to the base rate and do a gross lease instead.
Our preference would be to control/lock in your costs with gross leases. You do not want to be hit with a huge unexpected bill because a landlord decides you are on the hook for repaving the parking lot. These kinds of things do happen.
TIP: It is common for warehouse leases to stipulate that the landlord covers all repairs except for the A/C. Be careful with this and negotiate it away if possible. The A/C will be the most expensive repair you will face in a warehouse. In one of our warehouses, we negotiated it away by agreeing to pay $100/year for an annual maintenance contract with the A/C company.
Step 2: Make decisions about equipment/furnishings
Hopefully, you now have a warehouse and it is time to fill it with the equipment you need to get started. Below is a list of things you will need. At the end of the blueprint, we list vendors.
TIP: Start your research in this section, but for many of these items, don’t start buying yet. Wait until you have done your warehouse layout diagram in step 3, which will tell you exactly what quantities and sizes you need to purchase.
Furnishings / Supplies
Picking shelves
Picking shelves are the shelves used to hold bins of all your SKUs. Each SKU gets a bin that will be put into a specific location on a specific shelf.
Above, when we calculated the size of your warehouse, we discussed the calculation for how many linear feet of shelving units that you need. Here is the formula:
Horizontal space needed per SKU X Number of SKUs / Number of shelves on a shelving unit
Let’s say that you have 200 SKUs, each SKU is going to take up 2’ of space on a shelf, and every shelving unit has 4 shelves. You need 100 linear feet of linear shelving units.
2 feet X 200 SKUs / 4 shelves = 100 feet of shelving units
You have a few directions you can go with this kind of shelving, and the pricing is all over the map. Here are some options:
Pallet rack
You can use standard pallet rack and configure it with shelves. This is exactly what Home Depot does. It gives you the advantage of having storage space above the picking area if you need it. This is not the cheapest option.
Industrial shelves
Industrial shelves are designed to be easy to put together and hold a lot of weight. Look for boltless shelves, which are easily configurable if you decide to change shelf heights or number of shelves. This is a great option that we often use.
Gravity flow
If you sell products that expire, you want to sell the oldest product first. Gravity flow rack is a great way to do that and is also easy to restock. The shelves are sloped and restocked from the back. Pickers pick from the front, and as inventory is sold, the new inventory slides forward.
Gravity flow is expensive and also wider than normal shelves. If you decide to go in this direction, look for it used.
Other inexpensive options
You can purchase inexpensive shelving at places like Home Depot if you need to. It will tend to not last as long but can work if you sell lightweight products.
Other shelving/rack for the overflow area
Depending on your situation, you may need some kind of shelving in your overflow area. Typically, you will be storing heavier, bigger cases on this shelving, so it needs to be heavy-duty, probably with fewer shelves per unit.
If you are going high in your warehouse, this is the first place to do it. Pallet rack works well and can be configured for either pallet storage or shelves for case storage.
You may decide to just keep pallets on the floor in your overflow area. In that case, you do not need shelves at all.
Conveyor line
After the picker picks an order, it is going to be put into a picking bin and fed through a process that involves QA, packing, and shipping. This requires some kind of conveyor line.
If you want to start as inexpensively as possible, your “conveyor” could just be a row of tables. The picker will put a picked order at the beginning of the row, and the order will slide through the stations along the row. While not ideal, this works.
We recommend initially buying a few runs of used flexible conveyor. While expensive to purchase new, you can find great deals on used conveyor.
Packing station(s)
A packing station is just a table of some sort big enough to hold a computer and a few other pieces of equipment.
QA station(s)
A QA station is just a small table, but it could just be a place along the conveyor where someone stands. As you will read later, you may decide to merge QA with packing and not need anything at all.
Shipping station(s)
A shipping station is the last point in the conveyor. It consists of a table big enough to hold a computer and a few other pieces of equipment.
Pallet mover(s)
If you need to handle pallets, you need either a pallet jack, a forklift, or something in between. When starting out, assuming you are working on a single level (no high pallet storage), a pallet jack or two really will be all you need. Purchase these used.
Cameras
Employee theft is rampant in warehouses, especially in situations where products can be sold on eBay. The easy solution is cameras.
You do not need a sophisticated camera system. Google Nest cameras are perfectly fine and inexpensive.
Shelf bins
It is important to make sure that your SKUs are separated on the picking shelves. Based on your product type, you can purchase all kinds of bins of any size from sources like ULINE. If you are selling relatively small, light products, just buy inexpensive cardboard bins.
If you receive inventory in case lots, it is quite possible that the case itself can function as the bin. In fact, this is usually more efficient.
Picking bins
When pickers pick an order, they need a bin in which to put the products in the order along with the packing slip. There are all kinds of options for this as well. We recommend something that is heavy duty such as a thick plastic.
Tape dispensers
Tape dispensers make it easy to measure and cut tape to apply to packing boxes. If possible, we recommend that you use Kraft paper tape that can be easily dispensed by a machine from a company like Better Pack.
Packing material dispensers
We will cover package fillers below, but you may need a machine to dispense the filler you choose. For example, if you use crumpled paper as a filler, a machine will make it easy to crumple, dispense, and cut that paper for you.
Miscellaneous
- Box cutters
- Cleaning supplies
- Extension cords
- Bathroom items
Technology
The Capacify Doctrine states that technology is a means to an end rather than an end in itself. We don’t want to dump fancy technology in a warehouse just because it is cool, but we do want to use technology to improve accuracy and efficiency.
With that in mind, the technology in this blueprint is designed to be bare-boned but very efficient.
Here are the main things that we want to use hardware/software to accomplish:
- Keep track of all inventory in the warehouse, including its exact location.
- Calculate and build accurate replenishment POs (purchase orders).
- Make it easy to audit all warehouse operations including receiving and shipping.
- Communicate with shipping carriers to check rates and generate labels for packages.
All of these things can be done manually with a pen and paper, but as you will see, using technology will make all of these jobs easy.
Now, let’s get into exactly what hardware and software you need.
Computers
You do not have to go overboard with your warehouse computers. The leftover computers lying around that no one else wants will do just fine. If you buy new ones, don’t pay for extra power that you do not need. These computers will essentially just need to be on the internet and able to browse websites.
Here are some general guidelines:
- Remember that warehouses tend to get dusty and things get knocked around a bit. This is not the place for $3000 Macbook Pros.
- You are probably safest staying away from Macs completely. If you are set on keeping Macs in a warehouse, don’t buy anything until you are sure that all the software, scales, and printers you are going to use are compatible. As an example, getting some label printers to work on a Mac can be tricky.
- Choose big screens if you can.
- Consider touch screens. Many of the jobs in the warehouse are more efficient with touch screens.
- Make sure you have lots of USB ports. As you will see, we hook up several peripherals.
You will need one computer for each packing station and each shipping station. If possible, you should also plan on a computer in the receiving area.
Peripherals
Scales
Depending on your workflow, you may need a scale at every packing station and every shipping station. You will need a scale for sure at one of the two stations.
We recommend a combination of inexpensive and expensive scales. In our warehouses, we have expensive scales at packing stations and inexpensive ones at the shipping station (where they are used infrequently).
The scales need to be compatible with the software systems you use and will connect to your computer via USB.
Printers
You will need a label printer at every shipping station, and possibly at packing stations as well (based on your workflow).
In addition to printing labels, you will be printing packing slips and end-of-day reports for carriers. Both can be printed either with label printers or a separate office printer.
If you choose to print packing slips or end-of-day reports on label printers, have at least one label printer that prints at a DPI of 300. Otherwise, you can stick with the more standard (and less expensive) 203 DPI label printers.
Scanners
There are two different kinds of scanners you need.
- Inexpensive scanners that are connected to the packing/shipping computers via USB. These are used to read barcodes on packing slips to quickly retrieve an order. You can purchase these kinds of scanners extremely inexpensively on Amazon.
- Handheld scanners that are used by the pickers when picking orders. Typically, they will scan a packing slip and then scan each product as it is picked. These scanners have to be compatible with the warehouse management software you choose, and are often sold by the same vendor.
Software
Let’s look at a diagram of how orders flow through a typical DTC/Ecommerce business:
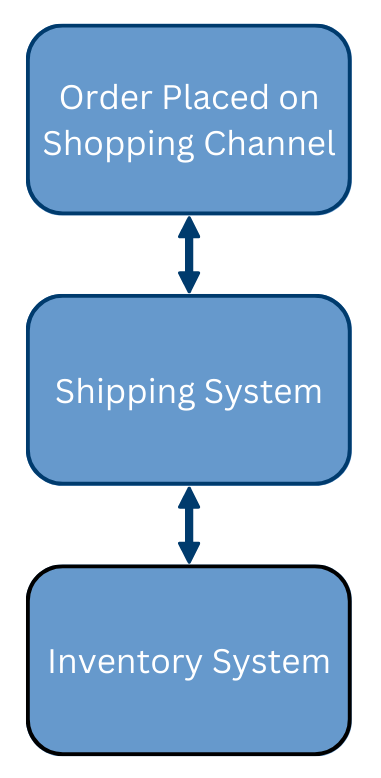
Note that there are two primary functions in warehouse fulfillment software: inventory management and shipping. Sometimes, these two functions are combined into one software system, but more often, there is a separate system for each role and the system communicate with each other.
At the moment, we strongly recommend that you get one software system for each function. We cannot recommend any of the dual-function systems that are currently on the market.
Now, let’s discuss these two systems in more detail.
Inventory management system
Here are the primary tasks of your inventory management software:
- Keep track of the inventory levels and locations of every SKU you sell.
- Maintain records of every change in inventory. These changes happen every time you sell something, receive something, or have to adjust inventory because of a physical audit or another reason.
- Based on the criteria you set, generate POs automatically by watching inventory levels and anticipating when reorders need to take place.
- Provide a receiving process for when a PO is received and recorded.
- Keep track not just of inventory in the warehouse but also inventory on the way and inventory that may still be in the warehouse but is already sold.
- Communicate inventory counts to the shipping software so it can keep track of what orders are available to be shipped.
- Support the picking process. If your pickers use barcode scanners, those scanners will run an app that communicates with your inventory management system and guides the picker through the picking area. As inventory is picked, the barcode scanners will communicate the picked status back to the inventory management system.
- Communicate inventory statuses to retail websites and other selling channels so that product is not oversold.
This software is complicated and is the most important technology in a typical fulfillment warehouse. In many respects, it is the brains of the entire operation, communicating with many different systems around it.
Shipping system
The main roles of the shipping system are the following:
- Import orders from various shopping platforms such as e-commerce websites.
- Communicate with the inventory management system to make sure inventory is available to fill orders and provide confirmation when orders are eventually shipped.
- Provide an interface for warehouse workers to easily research orders/shipments and categorize them in various ways.
- Automate the process of shipping as much as possible using automation rules. For example, an automation rule might automatically choose the appropriate-sized box for an order.
- Rate shop to find the best shipping option among different carriers.
- Generate carrier labels that can be printed and applied to shipments.
- Communicate end-of-day summary information to carriers.
- Record tracking numbers for shipments and keep track of shipping statuses.
The shipping system is relatively straightforward and inexpensive.
Summary
Now that we have talked about both software needs, you might be wondering why we have not told you which systems to actually purchase. We do have favorites, and we do list some recommendations at the end of this blueprint. However, make sure that the systems you choose meet your specific needs. Spend a lot of time talking to potential software vendors, and if we can help, contact us.
One very important thing to remember is that the two software systems you pick have to communicate with each other. Make sure they are compatible before you move forward with either one.
Step 3: Putting it all together
Designing a layout
Before you start buying any furnishings for your warehouse, make sure you know the exact dimensions of your warehouse. Then, spend some time creating a drawing of how the warehouse should be laid out. This layout should be drawn to scale and precise on a grid layout.
If you have not done anything like this before, don’t worry. Software like SmartDraw is designed to make this process easy. What you are going for is something like this:
Draw to scale or you are wasting your time. If your warehouse is on the smaller side, let each box on the grid represent a square foot. Draw the outside of the warehouse first. If it is a 50×100’ building, your drawing should be 50 squares by 100 squares.
If there are interior walls or columns that you need to work around, make sure and put them on the drawing at this point too. Go into the building with a tape measure so you get them onto the drawing correctly. This is important; a column not accounted for could destroy your entire layout.
Now, it is time to start placing your furnishings. Again, no guessing on size. If you plan to place shelving units of 4×8’ in your picking area, use a rectangle shape to represent them that is 4 squares wide and 8 squares long. Use the same idea for your desks, tables, conveyor belt, aisles, and everything else in your building.
When you are done, you should have an exact blueprint of your layout. You should also know exactly what you need to purchase, from the number of shelving units and their sizes to the length of your conveyor. You should be able to print your plan, walk into the warehouse and a measuring tape and start snapping chalk lines exactly where every single thing should go.
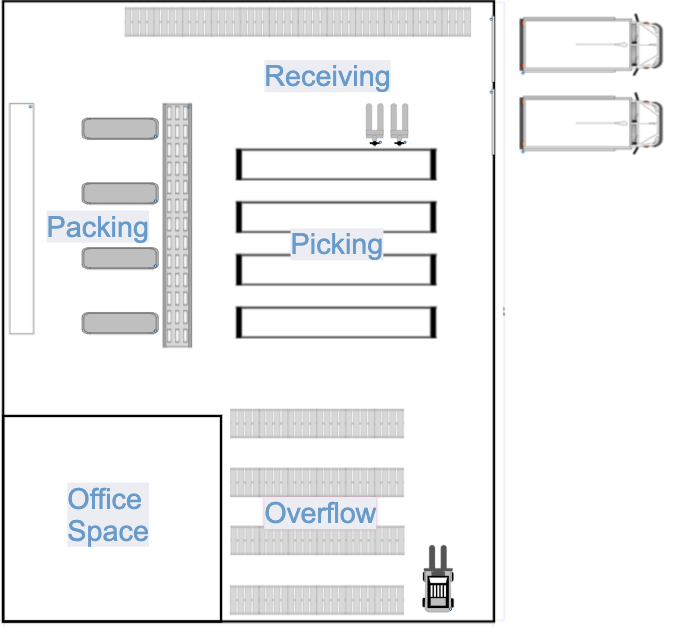
If you feel unready to lay out a warehouse, don’t worry. We are about to review the four main areas of your warehouse and tell you exactly how to plan each one.
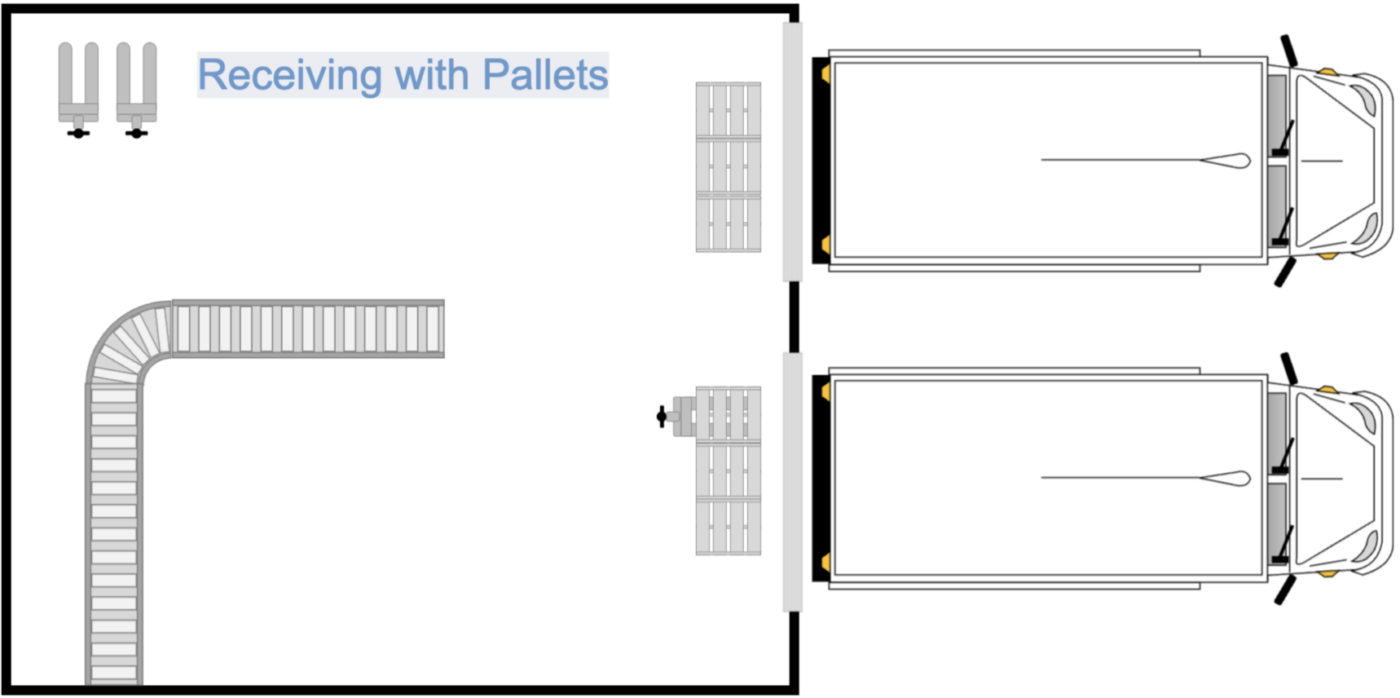
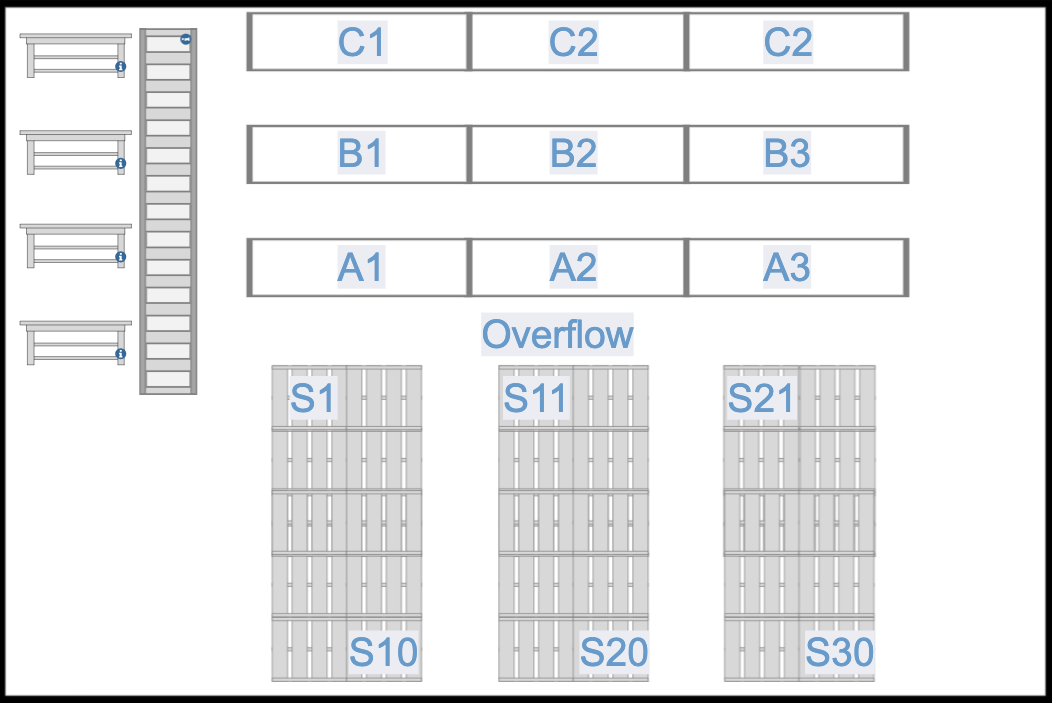
Receiving area
The receiving area should be a comfortably-large relatively empty space where incoming shipments are temporarily stored and processed before going to either overflow or the picking area.
If you receive pallets, determine how many pallets you might receive at a time and design a space large enough to comfortably hold them and allow employees to process them. If you receive cases, you should perhaps have tables where employees can open the cases and sort and organize products.
Regardless of whether you receive shipments by pallets or cases, it is a good idea to have a small desk and computer in this area. This will allow an employee to record received POs into your inventory management system.
Here are a few sample receiving area layouts. This first one is for a warehouse that generally receives about six pallets at a time.
Here is a sample receiving area for a situation where the product comes in cases rather than by the pallet.

Overflow
The overflow area is where you store excess inventory that cannot fit into the picking area. Remember why we want this: if you do not limit the size of your picking area, you increase the amount of time it takes to pick orders because more steps are required.
You have a lot of options in your overflow area compared to the other three areas.
- You can use pallet rack that is set up to either store cases or pallets.
- If you want to stay on a single level (avoid a forklift), you can use industrial shelves similar to the ones in your picking area.
- If you typically receive pallets, you can just store pallets on the floor in this area.
Keep in mind that if are going to store pallets on the floor, you need roughly 6’ aisles to move them around with a pallet jack. If you are going to be using a forklift, check with the manufacturer on minimum aisle widths.
Note: Before you finalize your overflow layout, you might want to skip ahead and read about overflow strategies <LINK>. This might affect how you want to lay this section out.
Here is a sample overflow area.

Tip: A good rule of thumb is to never put anything against the wall in a warehouse. Leave at least a few feet between pallets or shelves and the wall. This is for safety and makes it convenient to do work on the building itself. Also, this buffer will help you identify problems such as rodents.
Picking
The picking area usually consists of a set of shelving units. Each shelving unit is divided into bin locations, and each SKU is assigned to a bin. When picking, employees are directed to bins to “pick” products for an order.
We have already discussed how to determine the number of shelving units you need. Lay these units out in a square (as much as possible) and put 42” aisles between the units (perhaps wider if you expect to have several employees). For example, if you need 120 linear feet of shelving units, you could do six 20’ long rows of shelves (utilizing front and back when possible) like this:
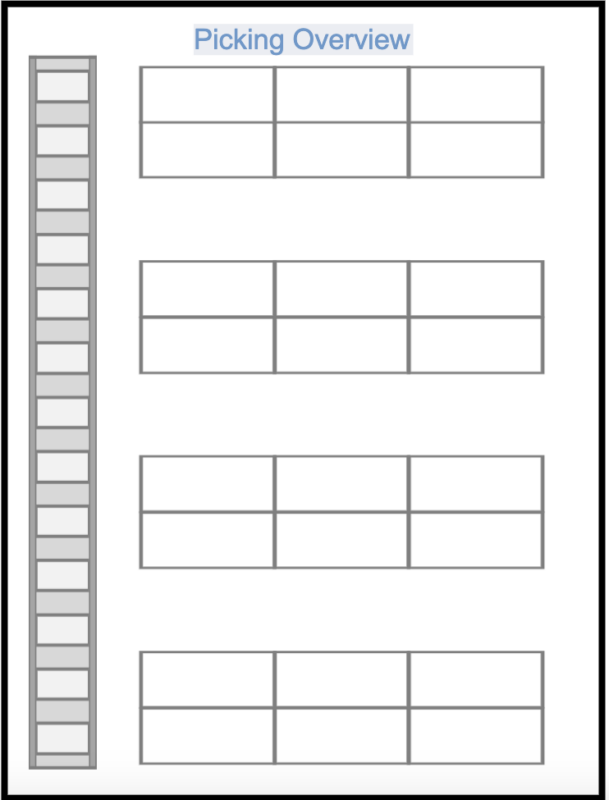
Don’t overcomplicate this but think it through too. Remember that your goal is to eliminate waste when picking. Picking is typically the most time-consuming part of filling an order. We will talk about this in more detail later, but here are a few layout tips:
- Always leave an aisle on both ends of the rows so that employees do not have to backtrace to go to the next aisle.
- If you have long runs of shelving units, you might consider having an open space halfway through each run to create another horizontal aisle.
- Be strategic when deciding how many shelves should go on each shelving unit. The more shelving rows, the less space you need and the fewer steps your employees have to walk. However, if you make the shelves too tight, that can create inefficiency as well.
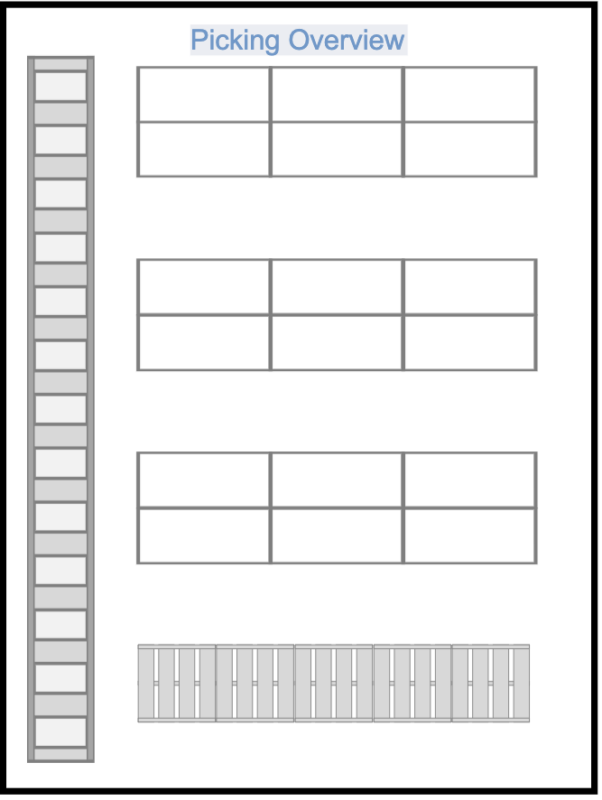
For fast-moving products, you may want to pick from a pallet rather than keep the product on a shelf. In those cases, simply mark those pallet positions on your layout.
Here is a sample layout with pallet picking.
Shipping
The shipping area is the most complicated and requires a lot of attention to detail. Remember that orders will be placed in this area after being picked. They leave this area (are put on an outbound truck) after QA, packing, and shipping.
The shipping process is a very linear process and you need to lay out the area in a linear way. We like conveyor to help move the orders through the process, but you don’t have to use conveyor. Even a row of tables will work.
One decision you need to make is whether you are going to combine packing and QA into one station (we recommend this generally). If you do combine these stations, you might have a line that is laid out like this:
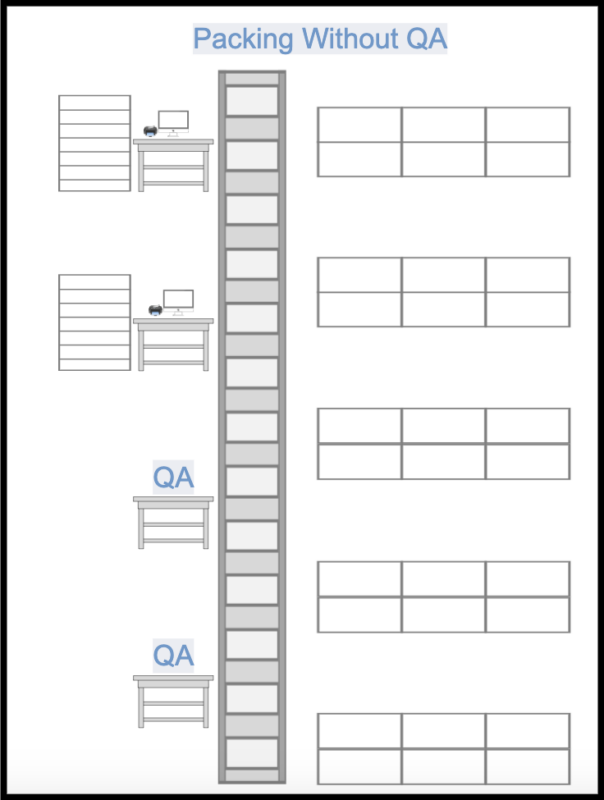
If you don’t combine QA with packing, you might end up with something like this.
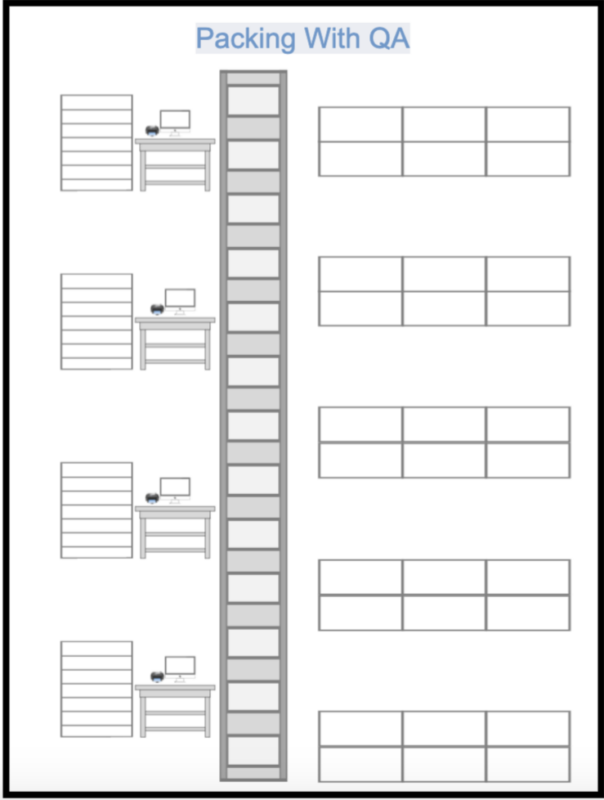
Remember that shipping supplies need to be stored in this area. Depending on what you are shipping, you might have a few pallets of shipping boxes and other supplies. These pallets should be as close as possible to the packing station. Last, leave space for storing the completed orders before they are loaded onto an outbound truck.
Here is a complete layout.
DIAGRAM 11
Summary
If you have been following along, you now know how to lay out each of the four areas of your warehouse. Take some time on this; while your layout will not be set in stone, it will probably be pretty time-consuming to change down the road.
Once you are happy with your layout, you know exactly what you need to buy. Go ahead and do that now.
Area setups
Now that you have a warehouse, know exactly how to lay it out, and have acquired the furnishings on your layout, it is time to start setting it all up. Let’s walk through the four areas again one at a time.
Receiving area
The receiving area is by far the easiest area to set up, largely because it is mostly an empty area.
Ideally, this area will contain a small desk, and on the desk, you will have two things:
- A computer that accesses your inventory management software. You will use this software to check in received inventory against POs (purchase orders).
- A simple filing system for the packing slips associated with received orders. This could be as simple as a few boxes that hold packing slips that are physically received but not recorded and packing slips that have been recorded.
This area should also contain box cutters, trash cans, and whatever miscellaneous supplies might be appropriate.
Your layout may contain shelves (if you receive by the case rather than the pallet), but otherwise, that is about it. The receiving area should be sparse and simple compared to other areas in your warehouse.
Overflow
Your overflow area needs to be divided into sections called sublocations. Let’s talk about that first.
Sublocations
If you have even a small warehouse that is full of thousands or even millions of specific items, you can imagine how hard it can get to find things. That is where sublocations come in.
Sublocations are specific areas (cubes of space) in your warehouse that are labeled in some way and easy to find. When inventory is placed into a sublocation, the sublocation is recorded in the inventory management software so that it can be easily found later on.
A sublocation might be a space on a shelf or perhaps a pallet location on the floor or rack. It could be an entire shelf. It can be either a big space or a small space depending on the warehouse’s needs.
Tip: Make sure that your sublocations are well-labeled throughout the warehouse. If you are using pallet sublocations, you might mark them out with tape.
Overflow organization strategies
Now, we can discuss the overflow area, which holds the excess inventory that cannot fit into the picking area. Your overflow area can be configured in numerous ways, but it is important that it is organized. Your warehouse staff will be regularly moving inventory from the overflow area to the picking area, and to do this efficiently, they need to be able to find the inventory quickly.
Again, there is no one way to do this. We are going to cover three alternative strategies in this section. Choose one of them or come up with your own. The important thing is that your strategy works well for your situation.
Strategy 1: Create sublocations that align with your picking layout
Let’s say that you have six aisles in your picking area, labeled from A1-A6. You could set up six sublocations in overflow labeled from OF1-OF6. Then, if staff is restocking on aisle 2, they know that they can find the overflow stock in OF2 in the overflow area.
You have to decide how granular this area needs to be. If you have a lot of SKUs on an aisle, one overflow sublocation for the entire aisle may be inefficient. If there are 3 shelving units per aisle, you could set up a sublocation for each one. For example, sublocation OF1.2 could refer to products that are found in aisle 1, shelving unit 2 of your picking area.
You can go as granular as you want with this, but remember a simple principle: more granularity is more efficient because stockers will find products quicker, but more granularity will also use more space. Look for a balance between efficiency and space, based on what works for your warehouse and products.

Strategy 2: Define very granular sublocations with no connection to the picking area.
Let’s say that have 1,000 ft of linear shelf space in your overflow area. You could divide this up into 1,000 sublocations, numbered from OF000 – OF999.
Here is how it works: when employees receive inventory that needs to go into overflow, they simply go to the first sublocation that is open and check it in (using a handheld scanner). There is no obvious relationship between where products are stored and anything else in the warehouse. It is completely random.
Later on, when that inventory needs to be found, an employee knows exactly where to look because it is recorded in the inventory management system. Once it is found and removed, the sublocation becomes available for other inventory.
This strategy is great for fully optimizing space and makes it very easy to find inventory. On the flip side, small warehouses may find this system cumbersome.
By the way, a form of this strategy is utilized in Amazon warehouses.
Strategy 3: Store overflow inventory adjacent to its picking shelf
You have probably noticed that in Home Depot, overflow is stored on pallet rack directly above the products on the shelves. That makes the overflow easy to find, and it also eliminates the need to have overflow sublocations at all. If inventory on a shelf runs out, an employee simply retrieves more inventory from the rack above the shelf. While the inventory exists in two separate areas (on the shelf and above the shelf), inside the inventory management system, it is combined into one location.
You can do this in your warehouse as well, either by putting the stock above your picking area or perhaps directly behind it on pallets. In this kind of system, there is no real need to define sublocations in your overflow area at all and stock does not need to be transferred between overflow and your picking area in your inventory management software. The picking location of a SKU defines where the overflow will be, and the inventory count at the picking location includes that overflow inventory.
This is probably the most efficient strategy for overflow if it will work in your warehouse. Very often, it won’t, but perhaps you can utilize this system for your heaviest movers. For example, if you have your heaviest movers on aisle 1, you might be able to put a line of pallets with overflow behind aisle 1.

Picking
Your picking area organization should always be about efficiency. Picking is normally the most time-consuming part of shipping an order.
The primary consideration of improving efficiency is reducing movement (steps).
Your layout probably shows your picking area as a set of aisles but really, a picking area is a lot of small sublocations (sometimes called bin locations). There should be one for each SKU. If well designed, an employee should be able to instinctively and immediately go to any sublocation/bin to pick a product.
Naming sublocations/bins
Naming bins well is very important. Here is how a typical bin location might be named:
Q1-R16
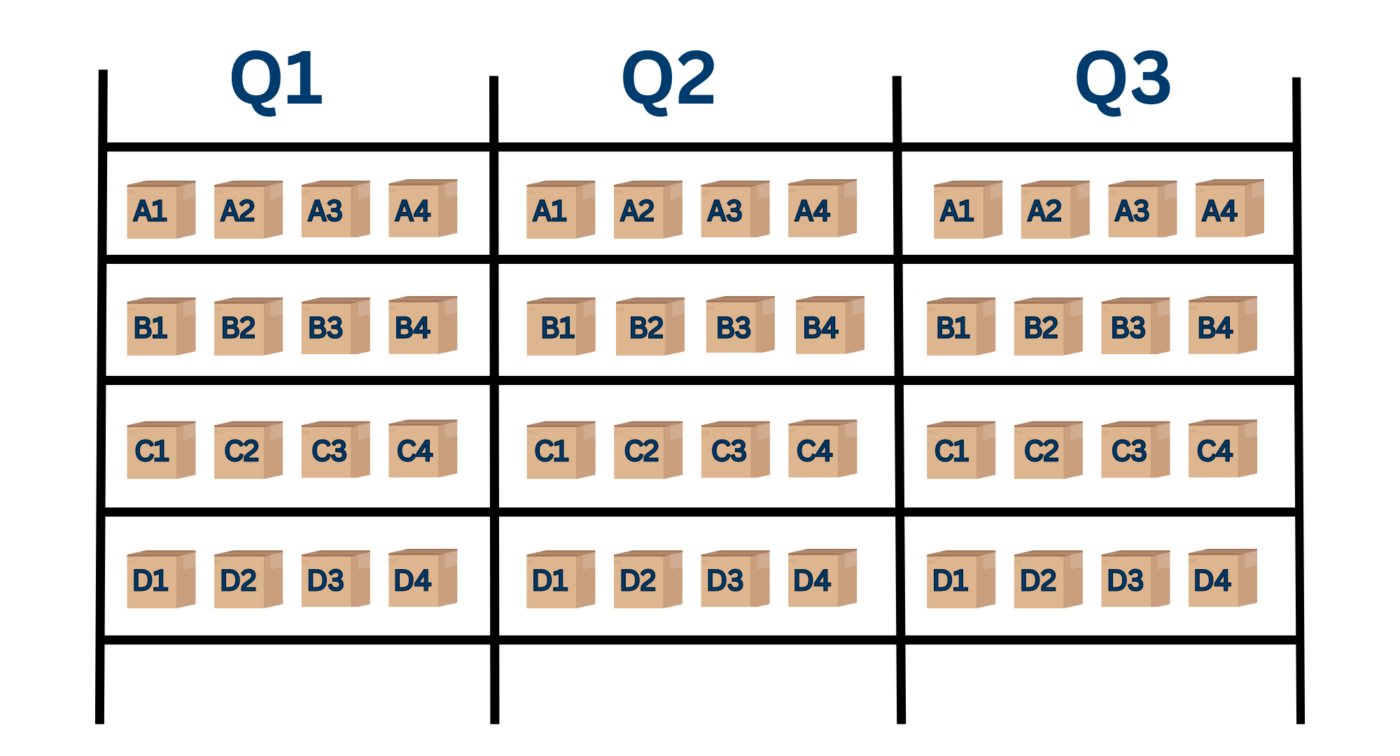
As you can see, once employees know how your bin names are organized, they can very quickly get to the right location.
Labeling your bin/sublocations
If you are using shelves rather than pallets, you may have chosen to use bins made of cardboard (or something else). Go ahead and put those into place now and label each bin with its bin location name.
If you are planning to use cases as bins, find a way to label the bin location on the shelf itself.
And if you are using pallet positions as bin locations, find a way to label those as well. Sometimes, you can hang the name from the ceiling or find a way to semi-permanently write it on the floor.
Efficiency tips
Now that you know how to name sublocation/bins in a picking area, let’s consider some ways to eliminate steps. You are possibly not ready to actually assign products to your sublocations/bins yet, but keep these thoughts in mind for when you do.
- Typically, there is a starting place for the picking process (such as a stack of packing slips and perhaps a stack of empty packing bins). Your top movers need to be closest to this point. In other words, you want as many orders picked as possible with almost no steps at all.
- Make sure that your bin names are designed to eliminate steps. If an employee is using a handheld scanner, it is probably going to be directing him/her through the picking area using bin names, quite possibly in alphabetic order. Ideally, the employee walks one time through an aisle picking on the left and right along the way. Make sure your bin names support this movement.
- Remember that it is more inefficient to reach up or crouch down. All things being equal, avoid assigning fast movers to bottom shelves or top shelves. The sweet spot for picking is between the waist and eye level.
- Avoid assigning heavier objects to bin locations on higher shelves (both for safety and efficiency).
Again, file some of this information away for when you actually assign products to bin locations if you are not ready to do it now.
Shipping
Go ahead and position all of your furnishings for the shipping area based on the layout you have created. Here are some more specific details for each area.
QA
Depending on your QA plan, you may not need anything special in this area other than a small table. QA simply involves comparing the packing slip to the picked items. You may also want a small table to place bins that have a picking error.
Packing
Your packing station is probably a table/desk area and needs the following:
- Computer
- Scale (connected via USB to computer)
- Tape dispenser
- Barcode scanner (connected via USB to computer)
- Void fill machine (such as a paper crumpler)
Make sure this station has easy access to packing materials (boxes, tape rolls, and void fill). You will also need some space for stacking empty picking bins and space for problem orders that need further attention.
Shipping
The shipping station is probably a table/desk area and needs the following:
- Computer
- Scale (connected via USB to computer)
- Tape dispenser
- Label printer
You also need space to temporarily place shipments that are completed, and if you are putting them into carrier-approved bags or pallets, you need access to these supplies as well.
Outbound waiting area
This is a no-frills open space for storing bags or pallets of outbound shipments that are waiting for carrier pickup.
Initial software setup
We will not get too specific in this section because there are many options for vendor software and each will have a slightly different setup. However, we can give some overall setup general principles.
Remember that you have two major software systems in your warehouse: inventory management and shipping. Possibly, you may use a system that combines both of these functions, but we will assume in this blueprint that they are separate.
Inventory management system
Very likely, your vendor will provide some setup help, and we encourage you to take advantage of it. Here are the major setup tasks that you will almost certainly need to do:
- Set up general information about your business including your location, vendors, and desired settings.
- Add all of your products along with product information such as name, supplier, and supplier price.
- Add all the sublocations you have set up in your warehouse.
- Specify a picking bin location for every product.
- Define a strategy for how/when to reorder inventory. There are several choices that we will discuss later.
- Record the initial inventory levels for each product.
- Connect the system to your selling channels (such as websites) and your shipping system.
Do not expect this process to go quickly, and again, lean heavily on the expertise of your vendor. You should be able to import most of the data rather than typing it in manually.
Important: In your inventory system, there will be a difference between a “product” and “stock.” A product is a description of something you sell while stock is an actual count of that description.
In other words, in the context of inventory management systems, a product is not anything physical in itself. The stock represents the physical inventory count of a product. It is incorrect to ask where a product is stored in a warehouse. You actually what to know where the stock of a product is stored in a warehouse.
Yes, this is sort of nebulous, but you will save yourself a bit of pain if you understand it.
Barcoding
Your inventory management system will generally come with a barcode option. This is how it works:
- Barcode scanners are carried by the pickers.
- The barcode scanner has an app that is connected to your inventory management system.
- The app tells pickers where to go in the picking area and what products to pick.
- The pickers scan a barcode on the product (or the product’s bin) as it is picked. The app notifies pickers if the wrong product is being picked.
- The app communicates back to the inventory management system as orders are picked so the order status can be adjusted and inventory levels can be kept up to date.
Barcode scanners can also be used by warehouse workers to adjust inventory counts when needed, transfer stock between sublocations, and many other similar tasks. This increases efficiency because otherwise, the worker would need to walk to a computer to do these kinds of operations.
You can run a large warehouse without barcode scanners, but normally, you shouldn’t. Barcode scanners are enormously efficient and almost eliminate picking errors. In fact, if you use barcode scanners and enforce good operational systems, you really do not even need a QA station in the shipping area at all.
Barcode scanners are not cheap (roughly $500-$1000 each) and very often, the inventory management vendor may charge extra for this option. However, we strongly recommend it anyway. This is a critical use of technology that will improve the quality of your operations and will help make your warehouse run smoothly without your involvement.
One more word about barcode scanners. You may have products that do not have any codes on them to scan (such as a UPC code). In such cases, you can print a barcode for the bin itself that the picker scans. The picking error rate will probably be higher (because wrong products may end up in bins) but barcode scanning is still worth the cost.
Shipping system
The shipping system is considerably less complicated to set up than the inventory management system, but again, rely on the vendor for help if possible.
Here are the initial setup items:
- Connect the system to your various selling channels so that orders are imported automatically and shipping information (status and tracking numbers) are pushed back out to the channels.
- Add your carrier shipping accounts and choose the shipping options for each that you offer.
- Define how you want your packing slips and shipping labels to look. Tip: we recommend that you add a barcode to the packing slip to make it easier to pull up the order in the packing/shipping process.
- Add all of your products to the system with information like weight and dimensions. (This step may be optional but can be quite helpful.)
- Set up mapping and automations between your selling channels and your shipping system. This is an important step that will save you a lot of time. Automations allow orders to come into the system with certain data and options preset, making shipping very easy. For example, you might map a shipping option called “Expedited” on your website to “UPS 2nd Day Air” automatically. Or you might set up an automation that all orders containing a certain product get shipped overnight.
- Set up tags to help your shippers make good decisions and categorize orders. For example, you might have a tag “Do not ship” used by your customer service team that warns the warehouse not to fulfill the order yet. You can use automations to automatically tag products.
- Make sure that the shipping system is correctly connected to your inventory management system.
- Connect your scales/printers so that they can be used by the shipping system itself.
Shipping sysstems range from very inexpensive to quite sophisticated, and you generally pay for what you get. If you are using an inexpensive system (like ShipStation), do not expect a lot of hand-holding. However, these vendors should provide some kind of onboarding guide and chat support.
Testing
How will you know when you are ready to roll with your software? Testing is the answer. Test this workflow:
- Place an order on one of your selling channels (such as your website).
- Ensure that the order properly flows into your shipping system.
- Make sure that the order flows from your shipping system into your inventory management system.
- Print a packing slip from the shipping system and verify that the picker can pick the order using a barcode scanner.
- Pack and ship the order using the shipping system. Verify that the shipping label is correct and customized to your liking.
- Ensure that the original selling channel is updated with the order status (shipped) and the tracking number.
Again, we cannot stress this enough. Setting this up is not something that you will get done in a few hours. It will take time and there is a big learning curve. Be patient and take the time to learn your systems, and lean heavily on vendor support.
The good news is that if you have followed the blueprint up to this point, you have a warehouse ready to go. Go ahead and move your product into your picking bins and overflow areas and you are ready to start shipping.
Operations: Job roles and staff
You now have a warehouse primed and ready to go. Now let’s talk about the staffing side.
Warehouse roles
If you walk into a typical fulfillment warehouse, it may look complicated, but it really isn’t. Typically, there are ten job roles, most of which are fairly simple. Let’s walk through all of them one at a time.
Receiving
When inbound shipments come into the warehouse, they have to be unpacked, received/checked in against outstanding POs in the inventory management system, and put away in the warehouse (either in the picking or overflow area).
Here is how a typical receiving process might look:
- The receiver opens up the shipment, finds the packing slip, and begins counting inventory and comparing it to the packing slip.
- Any discrepancies in inventory are marked on the packing slip. If the packing slip accurately reflects the inventory received, that is noted on the packing slip as well.
- The packing slip is placed in a bin on the desk in the area. At some point, the receiver finds the PO in the inventory management system that corresponds to the packing slip and performs an operation to mark the PO received and complete (or partially received if a discrepancy is found).
- The product in the shipment is moved into inventory. If possible, it normally goes straight into the packing area, but if there is no room in the packing area, it is stored in overflow.
- If necessary (depending on the system being used), the receiver inputs where the stock is being stored into the inventory management system (normally with a handheld scanner).
Obviously, the exact process of receiving shipments into the inventory management system is dependent on the system itself. But this is the basic process.
Picking
There are various picking strategies that can be employed in a warehouse. In this blueprint, we are going to focus on the most basic and common strategy in which a picker is responsible for picking an entire order and only picks one order at a time. Here is the process that is used:
- One designated picker starts the day by printing packing slips for all orders that need to be shipped. The packing slips are put in a stack in a starting place in the picking area.
- A picker takes a packing slip off the stack and picks up an empty packing bin.
- The picker scans the barcode on the packing slip, which loads the order into the scanner and begins directing the picker through the picking area.
- The picker is told which sublocations/bins to go to and how many items to pick at each one.
- The picker scans each item as it is picked. The barcode scanner confirms correct picks and notifies the picker if the wrong product is picked.
- When all the products are picked, the barcode scanner alerts the picker, who then places the completely picked order in the shipping area.
Alternate picking strategies
Again, there are many strategies for picking. In some cases, to save steps and increase efficiency, pickers pick multiple orders at the same time. Another strategy is called zone picking in which pickers stay in a particular zone and orders are passed between zones. This means that multiple pickers actually contribute to picking a single order.
The picking method you choose will depend on your specific needs, product mix, and volume. However, when in doubt, keep it simple and start with the basic single picker/single order strategy described above.
QA
QA is a very simple job. It consists of comparing the products that have been picked against the packing slip. This is typically a manual task, though your inventory management system or shipping system may provide some software-based tools to help you.
QA may not even be necessary if your pickers are using barcode scanners because the error rate should be close to 0%. Even if an occasional order is picked wrong, the resulting damage simply may not justify the expense of an official QA position.
If you do choose to have a QA station in your shipping area, it should either happen before the order is packed or in conjunction with packing the order. Errors need to be caught early to prevent wasted work later in the shipping process.
Packing
In your shipping area, the packing station is where the most work gets done, and if you are not careful, can become a bottleneck. Watch out for this. In our warehouses, we tend to look for ways to remove tasks from the packing station and move them to other stations to reduce bottlenecks.
Packing usually involves the following:
- Choosing the right box for the shipment.
- Building the box.
- Packing the box and adding void fill (such as crumpled paper).
- Passing the box down to the shipping station.
Shipping
Here are the main tasks of the shipping role:
- Comparing shipping rates among shippers.
- Inputting dimensions and weight into the shipping system.
- Printing the label.
- Closing the box and applying the label.
- Moving the completed shipment to the outbound waiting area.
Tip: In our warehouses, we can (and often do) combine the shipping station with the packing station to increase efficiency. There are actually numerous ways to increase efficiency in the shipping process but they are beyond the scope of this blueprint.
Restocking
Restocking consists of moving inventory from overflow into the picking area. There are many ways to accomplish this, and the frequency may vary. In some warehouses, this may need to be a daily task, while in others, it may be only necessary to do it weekly.
Restocking is necessary because you do not want pickers running out of product in the picking area and having to go find it in overflow. That kills efficiency. Ideally, there is a set time (perhaps at the end of the day when workers go through the picking area noticing which bins are low and going to get overflow stock to fill them.
Tip: Depending on your process and inventory management system, a report can identify what products need to be restocked. This will only be possible if you keep your overflow inventory in different sublocations from your picking inventory in your inventory management system.
Stock audits
On a periodic basis, you will need to audit your inventory, which means comparing your physical counts to the counts in your inventory management system. This is a simple process that you may decide to do once a quarter or even once a year.
The process is very simple. The warehouse staff physically counts each SKU and records the count somehow, perhaps in a spreadsheet. Someone else compares those physical counts to the counts in the inventory management system and adjusts the counts there to match the physical inventory counts.
If the inventory management system counts are significantly off from reality, that is a problem. It could be a counting problem, but could also be something more serious such as employee theft or a breakdown in your processes. You should not expect perfection, but as a general rule, your physical inventory counts should always match what your inventory management software counts.
Tip: Never give your employees doing this audit the SKU counts from the inventory management system. They should always count “blind.” If they know upfront what a count is supposed to be, they may cut corners in the counting and make assumptions, eventually just coming up with the same number in the inventory management system.
Maintenance
Make it a priority to keep your warehouse clean and organized. Here are things that should be done every day:
- Bathrooms should be cleaned.
- Clutter should be removed. Someone should walk through the warehouse looking for anything that does not belong and anything out of place (such as a product out of a bin sitting by itself).
- Used shipping boxes and supplies should be cleaned up and disposed of.
- Work areas should be reset at the end (or beginning of the day). Keep only the things in each area that are necessary to do the job.
On a weekly basis, a more thorough cleaning should be done, including sweeping floors and light dusting.
Purchasing
We are including the purchasing role in this blueprint, but in many businesses, it may not be a warehouse role. Remember that with a tight inventory management system, there is no real need to set foot in a warehouse to know what needs to be purchased.
That being said, if purchasing is set up correctly, it is an easy task to accomplish. Your inventory management system should generate the POs that you need to place based on what stock is running low. Quite often, the process can be done in just a few minutes a day by a warehouse employee.
We are going to discuss purchasing and inventory later in the blueprint in more detail.
Management
Your overall goal should be that your warehouse is self-managed. By that, we mean that your warehouse runs without consuming your time and energy. Later on, in the staffing section, we will discuss how to do this in detail. However, even a self-managed warehouse is going to need a leader to keep up with the big picture and resolve little problems that arise. Often, this person is not a manager, but rather just a team leader. Here are the roles required of the team leader:
- Make sure employees are present and engaged.
- Ensure that the workload is getting done on a timely basis.
- Resolve exceptions and problems as they come up, elevating issues as needed.
- Act as liaison between the warehouse and upper management.
- Establish relationships with shipping carrier drivers.
- Constantly look for ways to improve operations and increase efficiency.
Staffing
Running a warehouse will either be a miserable or great experience for your company based on your ability to do two things:
- Define clear, documented processes that employees can follow after a minimum of training.
- Hire the right people.
In this section, we are going to discuss this critical part of your warehouse in detail: who to look for, how to train them, and how to keep them.
Designing self-containing jobs and processes
In the last section, we defined ten distinct roles/jobs that generally need to be performed in a fulfillment warehouse. You may be able to use them as is or may need to tweak them a bit to match your needs.
Either way, these jobs need to be defined, and ideally, need to be self-contained. By “self-contained,” we mean that employees should be able to do a particular job without knowing anything about other jobs. This will allow you to bring in a new employee, train them on one or two of the easiest jobs (such as picking and QA) and have them productive within minutes.
Self-containing jobs benefit employees too. Having distinct self-contained job roles gives employees the opportunity to add to their skills and grow at their own pace into more complex positions that require more responsibility, all the way up to purchasing and even the team lead position.
Building out systems and documentation for each role
Assuming you are the CEO or an upper-level executive in your company, you should not be receiving calls or messages all day long from the warehouse. You should not have to go into the warehouse every day (unless you want to). In fact, you should almost be able to forget that the warehouse exists.
Yes, this is possible. In this section, we will tell you how to get to that point.
If you want a warehouse that runs on autopilot, your employees have to know exactly what to do. This only happens with well-defined, documented systems. That is not to say that they will never have questions and nothing will ever go wrong, but on a typical day, things should just flow.
From the very beginning, you should be developing a set of documentation for each role/job in your warehouse. This documentation needs a home; there are many help desk solutions on the market that cost very little, or you could just launch a WordPress site and turn it into a help desk.
Your documentation should have the following characteristics:
- It should be easily accessible to the people doing the jobs.
- It should give a blueprint of exactly how to do each job on a typical day.
- It should include contingency steps for when typical things go wrong. For example, if internet goes down, who should be contacted?
- It should be seen as a non-permanent, living document that can be amended regularly.
- it should be self-owned (and modified) by the actual people that do the job.
- It should include videos (using tools such as loom) and images.
- It should be kept up to date.
Note: We really believe in using video for training. It is increasingly easy to record and store video in these kinds of documents. Probably, most of your employees will be more comfortable learning that way rather than reading. And, even if things change, it is easy to rerecord video.
Can documentation address every single issue/problem that will arise in your warehouse? Of course not. But, it should be able to address almost all of them. Problems outside the documentation can be pushed to the team leader, and if beyond his/her capacity, can be pushed to you. But on a typical day, your warehouse should operate almost effortlessly without any involvement from you.
Hiring well
Hiring is a big, big challenge, and the best of us are going to make mistakes and misjudgments about potential hires. Here are some thoughts about how to find people that are likely to work well in a warehouse.
Accept transiency
Don’t take it personally that people will come and go. If you are hiring well, some people are going to outgrow your opportunity. Others will leave for any number of reasons. We know of warehouses where the average employee has been on the job for more than two decades, but that is rare. If you can pull that off with your warehouse, you are a rock star, but likely, you won’t.
You will not stop people from leaving, but you can insure yourself against disruption with three simple steps:
- Keeping your documentation up to date. Using your documentation, new employees should be able to be productive within minutes.
- Crosstraining employees on as many jobs as possible. It may be more efficient to keep an employee in the same job, but if something goes wrong, you need to have other people that can do that job.
- Developing employees from within. It is far easier to replace a picker than a team lead. If you are constantly developing your employees to be able to take on more responsibility, when you lose the team lead, the goal should be to promote from within and just hire someone to fill the newly-opened lower responsibility position.
Know the characteristics of good warehouse employees
The first advice we can give you about hiring warehouse employees is this: don’t hire warehouse employees. By that, we mean avoid “lifers” who work in typical, inefficient warehouses and have gotten used to doing next to nothing. A typical warehouse is just not a good place to find good employees.
We just said that you have to expect employees to come and go. A few may end up in positions of leadership in your organization where they can have a good career, but most will not. Lean into that. Hire people that you expect to be temporary such as students, work-from-home moms/dads, and elderly people looking for extra money. These are people you want, and in a moment, we will tell you how to attract them.
When evaluating potential hires, look for these things:
- A history demonstrating hard work. That does not mean they need an employment background. It could just be that they have shown effort in their education.
- Attention to detail. You do not need big-picture people who are careless with little details in your warehouse. What you really want are the people that obsess with details.
- Able to follow directions. You are not looking for people to come in and tell you everything you are doing wrong.
- Organized. If you get a moment, go peek in the back seat of their car. If it is a mess, expect them to treat your warehouse the same way.
- Dependable and reliable. Little things like showing up on time matter.
Consider a trial
If you have self-contained jobs and tight procedures, you should be able to try new employees for a few days with just a few minutes of training. Put trial employees on picking for a few days, pay them well, and watch them carefully.
Here are the warning signs:
- Unreasonable time spent in breaks or in the bathroom.
- Showing up late.
- Asking for accommodations (coming late or leaving early) during the trial.
- Inability to get along well with other employees.
- Sloppiness and or errors.
- A know-it-all attitude (as if they see their role as a consultant to “help” you).
Cut bait quickly
If an employee does not show promise quickly, move on quickly. People rarely change, and it is not your job to change people anyway. What you see in the beginning is probably the best you will get from an employee in terms of reliability and attitude.
We cannot say it enough: you cannot hope to achieve anywhere near 100% accuracy when hiring employees, and when you hire them, you cannot expect to keep them all. What you can do however is have systems in place that make it very easy to replace them and get new employees up to speed.
Tip: If your warehouse requires top-quality employees, that is probably not a good thing. It means that you do not have fully defined systems in place that allow average employees to succeed. It also means that you are going to have a much more difficult time finding your employees because top-quality employees are rare and in demand. The mark of a really great company is its ability to prosper with average employees.
Retain employees with a compelling workplace
While we just finished saying that you should expect your employees to leave, you really want to work hard to keep them (at least the good ones). Here are four major considerations that will make the difference in whether you can hold your good employees when the other offers invariably come their way.
Compensation
We strongly recommend that you do a survey of other warehouse positions in your area and make sure that you are offering a compensation package that is at least as competitive. If you have an Amazon warehouse in your area, look at their posted pay/benefits, because they will be your biggest competition.
Remember: you do not want to get into an endless pay increase war. In fact, we recommend that at best, match the average compensation in your area. There are other benefits that you can use to bring good employees in the door.
Benefits: One big question that many small businesses face is the question of benefits. Trying to match benefits with a large company can be daunting (though not impossible). If you want to punt on benefits, you can still attract great candidates by paying a higher base pay and being able to explain the actual dollar value of the benefits that other companies are offering. In other words, if you are offering $20/hour and your competitors offer $18/hour plus $2/hour worth of benefits, your compensation is similar.
Flexibility
At this point in time, US employees are extremely focused on flexibility and work-life balance. If you have set up your fulfillment warehouse right, you have the ability to make this dream come true, and we strongly recommend you lean into this trend and use it to attract great employees.
Both of our warehouses that we currently operate offer extreme flexibility to our employees. There are no set hours; employees can work whenever they want as long as certain deadlines are met. We have set up the warehouse with remote-controlled locks so that no employee has to be on-site when carriers unload or pick up shipments.
Offering this flexibility gives us the ability to attract good employees that otherwise could not work. Suddenly, work-from-home moms can work around their child’s school schedule and students can work around classes. If someone wants to work on Sunday or in the middle of the night, we are OK with it.
In our experience, fulfillment warehouses are very suited to offering this kind of flexibility, which provides a huge competitive advantage when it comes to hiring.
Job ownership
The Capacify Doctrine promotes the idea that every employee owns their domain and is tasked with the role of improving it. While generally, you do not want know-it-alls working in your warehouse, you do want employees that take pride in their work environment and want to make it better.
Involving employees in the process of systems improvement is a win-win. We strongly push our employees to improve their jobs and reward them when they do. In response, employees are less likely to see their jobs as boring and unfilling.
Making your employees feel as if they are part of the company with the ability to affect its outcomes is a competitive advantage compared to a place like Amazon, where they are just a nameless cog in a machine. Lean into being small and find ways to get your employees aligned with your growth.
Advancement
If you are running your warehouse well, you will be able to attract quality candidates without warehouse experience and over time, help some of them grow in responsibilities all the way up to team lead. Make this a priority. As already mentioned, this insulates you from employee attrition to a large extent, but it also gives your good employees another reason to stay around.
Good employees are going to want to see a path to grow within your company. Find a way to lay one out for them.
Inventory: Understanding purchasing and inventory strategies
It is highly likely that you may not want your warehouse staff doing the purchasing because this work often requires sophisticated financial knowledge. So why include a section on purchasing in this blueprint?
The answer is that it is extremely important and intertwined with warehouse decisions.
According to the Capacify Doctrine, inventory should be a competitive advantage. We cannot say that enough. Purchasing is not an afterthought; rather, it should be a critical part of your overall strategy. We are going to start with the basics but then dabble in a bit of that strategy.
How purchasing works in a fulfillment warehouse
There is a tried and true way that practically all businesses handle inventory purchases. Here is the process:
- A Purchase Order (PO) is created in the inventory management system. This is simply an order that is sent to the vendor and initially has an Open status.
- When the vendor’s shipment arrives at the warehouse, it is received against the PO in the system. The items in the shipment are compared to the items in the PO and if everything matches, the status of the PO is changed to Received. If some items are missing, some kind of process is used to resolve discrepancies.
- If the PO needs to be paid, another department is responsible for handling the PO from that point, and after that is done, the PO is marked fully completed.
Now, let’s talk about how inventory counts are affected by POs. This gets a bit complicated, but inventory counts can refer to different things. Here are some common terms you might run across.
Stock on hand: The quantity of a product physically in your possession (in your warehouse). You would use this count when you are doing a stock audit. For example, if your system says you have 12 units of Product X on hand, you should be able to find 12 units on the shelf.
Stock on order: The quantity of a product in open POs that have not been received. You might, for example, have an open PO for 100 units of Product X.
Committed stock: This is the quantity of stock that has been sold/reserved. For example, if you have 100 units of a product on the shelf but you have outstanding orders for 20 units that have not yet been picked/shipped, those 20 units are considered committed stock.
Available stock: This is arguably the most important stock number in your warehouse and the most complicated. Available stock is your stock on hand + your stock on order – your committed stock.
Let’s run through a quick example. Let’s say that you have 200 units of Product X in the warehouse and have an open PO for 100 more units. Let’s also say that you have sold 50 units of Product X but have not yet picked and shipped them. In that case, your available stock is 250 (200+100-50).
Your available stock is the number you are going to use to make purchasing decisions. It best represents what your current inventory levels are.
Purchasing strategies
Even in our age of technology, many warehouses still operate with very rudimentary purchasing systems. We have seen it all. For example, in some warehouses, reordering is not really a system at all. If someone notices that a product is low, they alert the purchaser, who places a reorder.
Some warehouses have crude but fairly efficient manual systems for reordering. For example, they may put a colored sticker on the last row of products in a case. When employees see that the sticker is exposed, they take it to a purchaser to buy more.
This kind of system is a feasible option for you as you begin your warehouse, though you should use your inventory management system rather than stickers.
For the sake of this blueprint, we will call this system the manual reorder point system. Here is how it works.
- Someone decides the minimum quantity needed on the shelf for each SKU. This is based probably on how fast it sells, but could also be based on other factors such as carrying cost, how long it takes to get reorders, and shelf life.
- This minimum quantity is stored in the inventory management system along with how much the purchaser should purchase when reordering. Perhaps this is based on how many are in a case or available volume discounts.
- The inventory management system keeps track of the available inventory count for each SKU, and when counts drop below minimum quantities, a PO is created in some way. Sometimes, this process can be automated and sometimes, the purchaser gets a report from the inventory management system of products that need to be reordered.
This system is widely used especially in the early days of a warehouse, but it is quite easy to move to a more sophisticated strategy once you start selling. This strategy is based on sales velocity, and works like this:
- The inventory management system keeps track of how fast a SKU is selling over a specific time (such as the last 60 days)
- Someone decides the minimum days of stock “on the shelf” that should be in inventory. For example, if you want 30 days on the shelf, you want enough available inventory to cover all the anticipated sales of the next 30 days.
- When the available inventory drops below the minimum days in inventory, a PO is generated to purchase more.
- Often, the quantity ordered is also based on velocity. For example, the system may be set up to reorder when there are less than 30 days of inventory available and to order enough to have at least 60 days available.
The velocity method has a huge advantage: no one has to keep tweaking manual reorder points. The reorder points adjust automatically based on how inventory is selling, and your growth is built right into the equation because the reorder points will automatically increase as you grow.
As you can imagine, we recommend that you use velocity-based reordering as much as possible. That being said, there are many tweaks you can make to the model, and there is a lot of decision-making you can make on top of the model as we will discuss below.
The purchasing role
It very well may be possible that your warehouse employees can be responsible for the placing of POs if you have set up the inventory management systems correctly. In fact, the system should look at the metrics you have set up and automatically create POs that can be sent to vendors.
On the other hand, purchasing well often requires far more sophistication than you should expect from your employees. Let’s say that your vendor is tight on cash and offers you a big discount if you purchase by the end of the month. In that case, you might want to order outside the normal velocity metrics and perhaps a much larger amount. You might want to order 180 days of inventory rather than 60 days, and that might require you to finance some of it.
In a situation like that, someone with financial sophistication who can calculate carrying costs and analyze the risks has to be making the decisions. It is no longer a warehouse role.
Here is a happy medium that we usually utilize:
- We use velocity ordering strategies and our inventory management system helps our warehouse generate most POs in a routine way.
- We are constantly looking for inventory opportunities that require more creativity and sophistication. In those cases, the buying decisions are pushed out of the warehouse to someone else.
Purchasing as a strategic advantage
For the past few decades, JIT (Just in Time) inventory strategies ruled the day. The thinking has been that if you have more inventory on hand than you really need, you are tying up cash to hold it and tying up resources to manage it. More warehouse space is required to hold it, and there is the risk of some of it going to waste.
All that makes sense. That works in a perfect world. It just doesn’t work in our world, and the 2020 pandemic exposed the problems with JIT in a spectacular way. Suddenly, businesses that were slammed with customers had nothing to sell. The pandemic disruptions that destroyed many businesses were not about customer shortages in many cases; the real issue was inventory shortages.
Wise old business people often turn out to be right in the end. A few old axioms about inventory come to mind:
He who has the most inventory wins.
You make far more money when you buy than when you sell.
In DTC/Ecommerce business circles, everyone talks about marketing and selling. Very few talk about buying smarter. But, buying smarter is very often an enormous missed opportunity.
Here are some general principles about inventory purchasing that we believe at Capacify:
- Keep an inventory cushion that is unfashionably large. If you can get more inventory in 30 days, don’t keep 40 days on the shelf as they teach in business school. Things really go wrong and that 10 days of cushion will not protect you. The best way to destroy your revenue is to have nothing to sell.
- Bet big when the market conditions create opportunities. Let’s say that you are notified of a coming 5% price increase. If you currently have 60 days on the shelf, why not buy an additional 100 days before the increase? Doing so drops that 5% directly to your bottom line. In a business that nets 15%, just taking a fairly safe bet on inventory will increase your net by 33%.
- Factor in the carrying/operational costs of increased inventory, but in perspective. Sometimes, it may require you to borrow for a few months to take advantage of a buying opportunity. Sometimes, you may have to temporarily lease more space. While these kinds of things cost money, they are often insignificant when compared to the benefits.
- Look for supply inefficiencies such as shortages and prepare for them. We can’t say this enough: inventory shortages will destroy your business.
Purchasing is a serious business. If you have a warehouse, it opens up a lot of purchasing strategies that few talk about. Obviously, there are far too many scenarios to discuss here, but if you have questions about your particular situation, feel free to contact us.
Appendixes
Appendix 1: List of vendors
Because many ask for vendor recommendations, we decided to add this section, but with some big caveats:
- We are not including vendors that we know are horrible. However, please do not assume that these are recommendations.
- If we have experience with a vendor, you will see * beside it.
- If we currently use a vendor and have had a good experience, you will see ** beside it.
- No vendor on this list pays us anything.
Warehouses
- Set up an alert on loopnet.com for buildings that match your criteria.*
- Find a local broker that specializes in commercial real estate.
If you have never negotiated a commercial lease before, make sure you have representation.
Furnishings: Shelving, pallet rack, conveyor, tables/desks, pallet jacks
Note: If you are not buying most of these items used, you are throwing away money. We cannot say this enough. Look on Craigslist, Facebook Marketplace, eBay, and similar sites.
ULINE: This is the big company in the office supplies. Generally, they are not the cheapest but they provide good service and are fast. If you need something fast, use them, but try to wean your business off them as soon as possible.*
Used warehouse supply stores. Check your area for these kinds of stores. They will not be as cheap as Craigslist, but will be more convenient and much cheaper than new.
If you are adventurous, you can import these kinds of items from China through sites like Alibaba. This may work well especially for larger items like pallet rack.
Computers/peripherals
Computers
Don’t overspend on computers, though large touchscreens are ideal. Very little computer power is needed and any reputable brand is fine.
General peripherals
Items like USB-connected barcode scanners and other inexpensive peripherals can be picked up on Amazon.
Scales
- Mettler-Toledo** (Very nice)
- DYMO* (Very cheap but adequate)
Label printers
- Zebra**
- Many other brands of varying quality. Make sure what you purchase is compatible with your shipping system
Software
Shipping system
- ShipStation*
- ShipHero (doubles as an inventory management system)
- ShipRush
- WorldShip (UPS only)
More and more over the years, we have moved from using this kind of software to our own custom solutions. However, while you are small, these inexpensive solutions work just fine.
Inventory management system
- Finale Inventory**
- Zoho Inventory
- SellerCloud
If you are large (>$10 million), you might want to look at an ERP rather than just inventory management software. Well-known ERPs include Odoo and NetSuite.
Note on software: While we are listing well-known options here, your software choices are critical. Spend some time making sure whatever you choose will meet your needs.
Void fill machines
Void fill refers to packing material added to a shipping box to fill the empty space and protect the products during shipping. There are all kinds of void-fill options including crumpled paper, styrofoam peanuts, air-filled pillows, and custom molds. Your product to a large extent will determine what void fill you need to use (if any).
When making decisions about void fill, consider the cost and also the customer experience. For example, old-style styrofoam peanuts are almost extinct because they are so annoying.
If you are looking for the cheapest, reasonable option, crumpled paper cannot be beaten. If you want to provide a premium experience, you can look at custom molds. Air-filled pillows are made on demand so take up very little space in the warehouse. However, the machines to fill the pillows are expensive.
Very often, companies that sell these supplies will either lease or even give you the accompanying machine. Carefully consider the entire cost of the materials and the machine to come up with a total cost, remembering that sometimes, foregoing that “free” machine might be the smart move if accepting it obligates you to buy overpriced void fill supplies.
Cameras/Security
- Google Nest**
- Many other options on the market.
Avoid old-school options that store the footage on-site. You can easily get inexpensive solutions that store the footage in the cloud and make it easily available to you on a phone app.
Consider getting smart locks on your warehouse that will allow you to lock/unlock doors remotely and provide codes to delivery workers. This will allow you to move toward implementing a flexible work schedule and will give you tighter controls over who is in the building.
There are many smart locks on the market, and because situations widely vary, we have no specific recommendations.
Miscellaneous
If you are looking for box cutters, industrial mops and other cleaning supplies, extension cords, and such things, just go to a local building supply store or order online from Amazon or ULINE.
Appendix 2: Analysis of fulfillment costs
If you are considering fulfilling yourself vs a 3PL, you need to count the cost. In this appendix, we will go through the costs you need to consider.
At this point in time, it costs us about $2/order to fill an order (roughly $1/labor and $1/infrastructure), while a 3PL would cost us 2-3X that when including all pick/pack, storage, and other fees.
Your situation may be different, and here are the variables you need to consider.
Labor
We budget 20 shipped orders per hour per employee. In other words, we expect to need one employee for every 160 orders we ship each day. It is assumed that the employees will not be only shipping during that time, but also doing other warehouse tasks such as receiving, maintenance, stock audits, restocking, etc. But even with other tasks, one employee should be able to produce an average of 20 shipped orders/hour.
The average employee costs us around $20/hour so our labor cost is around $1/order. Remember that your employee costs must include the cost of benefits, workers comp insurance, and your share of payroll taxes.
Please note: there are many factors that might change this in your situation. Labor costs vary. Our warehouses are in Atlanta and Salt Lake City which are probably mid-range labor markets. Also, the products you ship may make fulfillment either easier or much harder.
Infrastructure
Here are the primary ongoing costs associated with having a fulfillment warehouse:
- Warehouse lease (or purchasing cost)
- Liability and property insurance (you will need inventory insurance regardless of whether you fulfill yourself or use a 3PL)
- Building utilities (electricity, water, gas, internet, trash, pest control)
- Supplies (from computers to peripherals to simple things like box cutters and cleaning supplies)
Again, we hesitate to talk about numbers because situations are different, but we spend $1/order in these costs. Probably the biggest factor that will influence your cost per order will be the size (storage needs) of the products you ship.
If you are wondering about utilities, you can estimate them to be 10-15% of your lease payment.
Startup costs
Expect to spend at least $2-3 per square foot initially for the things you need to get started. If you go with a pallet rack configuration that requires a forklift, you will spend more than that.
Remember that you can save enormously on startup costs by buying used.
3PL comparison
We have already discussed the advantages of self-fulfillment over a 3PL, but if you are interested in a cost comparison, here is how to do it.
Rate shop a few 3PLs. They will probably ask a number of things before providing a quote, so have this data ready:
- Number of shipments/month
- Number of SKUs
- Average number of products in a shipment (3PLs often charge a picking fee per item)
- Total space required for your inventory (in cubic feet and/or in pallets)
While the 3PL estimate may come back very high, try to factor in these potential advantages that they offer.
- If they have your product in multiple warehouses, your shipping costs should be lower than you shipping from a single warehouse.
- They may offer better shipping rates than you can negotiate with carriers yourself.
Calculating the actual savings from these two benefits will require some analysis but is doable.
We won’t again go into the various things that can go wrong in a 3PL relationship and cost you big. Excluding those things, the only real expense you need to add when considering a 3PL is the cost of a person on your team that acts as a liaison. Either you or someone else will need to invest time into the relationship. This will involve contract negotiation, site visits, billing disputes, and routine problems among other things.